This issue reporting process template lets you automate their registration, identification, and analysis quickly. All the followings count as issues: bug, improvement, new feature and task. You can set the priority of the issue, request additional information and decide whether or not it should be resolved.
It’s a simple process that your organization’s members can use if they come across an issue. Plus, it’ll help you organize the information and generate useful data that shows how many issues are reported, how many of those are rejected (and why) and how many fixed.
Like all of our process templates, this one is ready to be used right away. You can also modify it so it fits your organization better. For example, you can add form fields or assign new users and roles for each task.
The issue reporting workflow
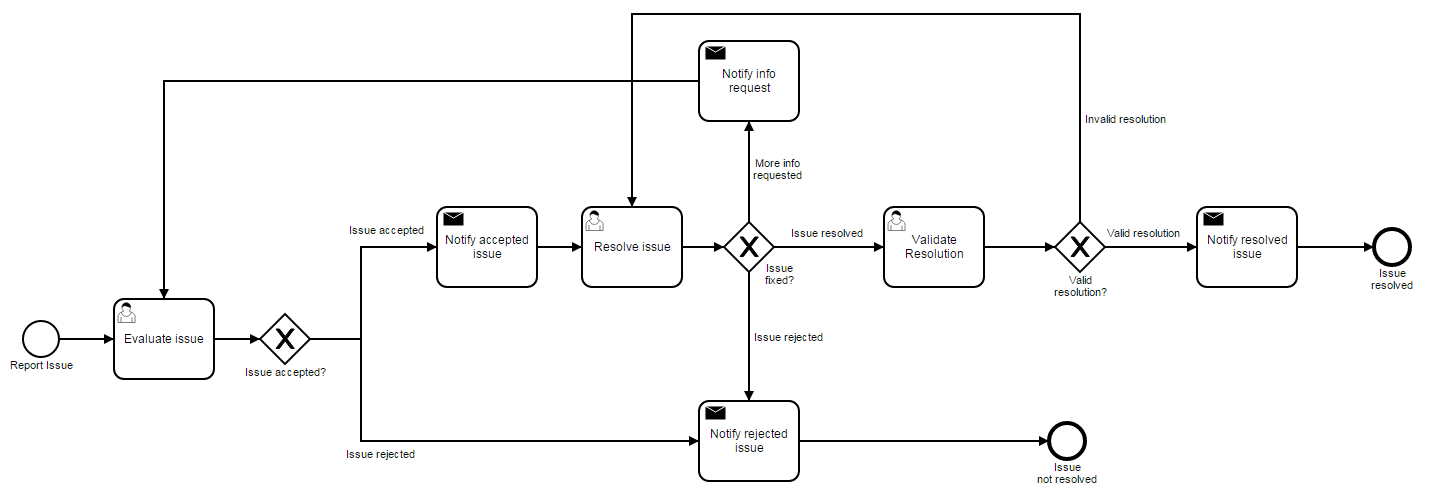
Firstly, you should think and define your process workflow. This is the issue reporting workflow modeled in Flokzu:
The issue reporting form
Secondly, you should define the data that the process stores. These are the issue reporting form fields defined in Flokzu:
- Issue Type (Bug, Improvement, New Feature, Task)
- Issue
- System
- Description
- Steps to reproduce bug
- Priority (Critical, Major, Minor, Trivial)
- Issue evaluation
- Request additional information
- Reason of rejection
Assigning issues
The process starts with an issue report. By default, all users can report an issue. To do so, they’ll have to complete some of the fields. To make the report even more complete, they can attach files (such as print screens).
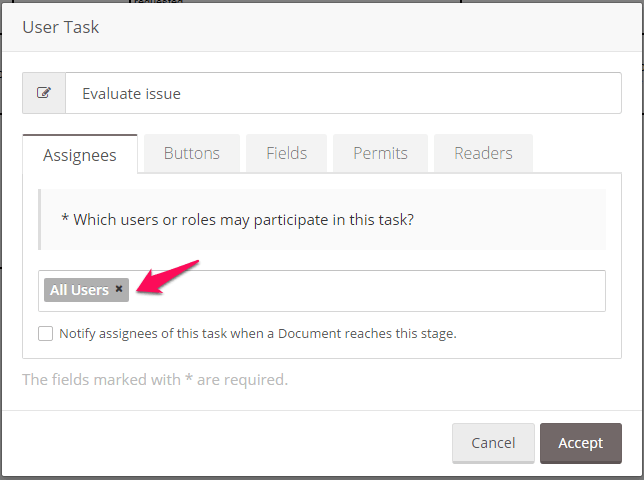
Once the issue has been reported, the next step is to evaluate it. By default, all users can complete this task, but we suggest you assign it to those users with enough technical knowledge to make that decision. You can create an “Evaluator” or “Technician” role that groups all users that can complete this task or you can assign it to individual users. To change the task’s Assignees, double-click on “Evaluate Issue” and change it here:
The evaluator must complete the field “Issue evaluation” explaining if he accepts it or not. If not, the reason must be stated under “Reason of rejection”. For example, the user may reject it because another user has already reported it, because the IT team is already aware of it or because it isn’t a software issue. If he chooses to reject the issue, the decision will be notified to whoever reported it, and the process will come to an end.
If the user accepts the issue, the process continues to the next step: resolving it. Subsequently, you can assign specific roles or users who must complete this task.
Finally, when the issue is resolved, someone must validate it. If additional information is required, it can be requested through the field “Request additional information” and the user who evaluated the issue will be notified and can complete that information in the “Description” field. It’s also possible to reject the issue, in which case the process also comes to an end.
In sum…
This process template lets you automate your issue reporting process in minutes. Moreover, you can do it in the cloud without technical skills. Remember that this and all of our process templates have System Roles as assignees for each task. You can edit this template to better fit your organization, create new roles, invite users, add or delete fields and event modify the workflow. This video will quickly show you how to import and customize a process template.


